
Step
Nine
Now lets finish off the aviary. First install a 1X4 along the loft front from the 1X4s you installed on the aviary sides, once again by screwing through the OSB from the inside into the 1X4. Cut out the vertical trim all ready installed. After you have done this cut a hole in the wall for your trap. The size is up to you. I make mine 19 by 12 inches because that is the size of my electronic sensors for my clock. see below.

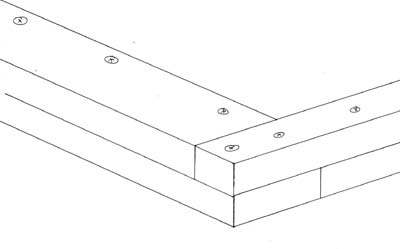
Now add a second 1X4 to the front of the aviary
floor. Measure the distance between the front 1X4 you just installed and
the back 1X4 installed on the wall and cut three pieces of 1X4 this
length. Install them front to back between the two long 1X4s on two foot
centers. Like this.

Now all you need to do here is add your wire to the
1X4s. I like using 1X1 inch welded wire. At a lot of hardware
stores or farm stores you can buy it in 3 foot wide rolls or by the foot.
Be sure and triangulate from opposite corners to square up your framing before
stapling on the wire. OK, now lets build the aviary front.
Start by ripping 3 or 4 1X4s in half. Take a
1X4 and lay it on the aviary floor, it will need to be cut. You need
space for it to open and close. You will need to cut about 1/2 to 3/4 off
all the long pieces for the aviary front. When this front is finished you
want about 3/8 inch gap on each side. After cutting your long pieces lay
out one 1X4 and one 1X2 crossways on a flat surface with five 1X2s running up
and down like the drawing below. Outside width about 95 and 1/4 inches, outside
height 48 inches. Measure corner to corner to square it up.
Then from your 24" wide roll of 1/2 by1/2 screen cut four pieces 46"
long. Staple each piece in position on the aviary front. Be careful
as these pieces are not held together by anything yet. If you have a wooden
deck or an extra piece of OSB this frame can be temporary screwed to it to hold
it in place as your stapling on the screen.

Once you have all four pieces of screen stapled
onto your aviary frame attach a second layer of the 1X2s and 1X4s on top of the
first layer. Screw this second layer to the first with your short sheet
rock screws every 6 inches. Be sure and remove your temporary hold down
screws as you go. And make the joints of the second layer opposite the
joints of the first layer, like this. Also when you screw the two 1X4
pieces together put all the screws along the inside edge of the 1X4 as we will
be cutting this end at a 45 and you don't want any screws in the blade path.

Once this done flip your aviary front over and
screw it together from the other side, 6" spacing again. And you
thought 5lbs of screws were to much. Have you bought your second box
yet? When that is done make a 45 degree saw cut from the bottom
corner of the 1X4 side the full length of the aviary front. Watch out for
screws. Cut it like this.

Now attach 4 hinges to the
bottom of the aviary front, set the aviary front in place and finish attaching
the hinges. Put a metal gate handle on the center 1X2 and your ready to
go.

The aviary front should rest on
the ground at about a 45 degree angle when open. If yours does not hit
the ground you can set a couple of blocks under the corners to support the
front when open.